When your computational workload outgrows a single machine, you enter the realm of multi-node computing. Whether you're running a molecular dynamics simulation that needs hundreds of cores, a self-contained workflow of smaller VCS compilation tasks, or fine-tuning a large language model across multiple GPUs, understanding how to harness multiple compute nodes effectively becomes essential. Multi-node jobs represent one of the most powerful yet complex aspects of cluster computing, and getting them right can make the difference between an efficient, cost-effective computation and a resource-wasting, hardly understood experience.
The challenge isn't just technical—it's conceptual. Multi-node jobs involve a fascinating interplay between resource allocation algorithms, process coordination, network communication, and job scheduling that can seem overwhelming at first. But once you understand the underlying principles and see how Gridware Cluster Scheduler (GCS) and Open Cluster Scheduler (OCS) handle these complexities, you'll have a powerful toolset for tackling computational problems that would be impossible on single machines.
Understanding Multi-Node Jobs: The Foundation
What Are Multi-Node Jobs?
Multi-node jobs represent computational workloads that span across multiple compute nodes in a cluster. Think of them as a way to break free from the constraints of a single machine's resources. You might have a single workload—like an MPI simulation—that gets distributed across multiple nodes, with each node handling part of the computation while communicating with the others. Alternatively, you could have a complete workflow where different related tasks execute across your allocated resources, perhaps preprocessing data on some nodes while others handle the main computation.
The real power comes from resource pooling. Instead of being limited to the 96 cores and 192GB of RAM on one node, you can aggregate resources across dozens or even hundreds of machines, giving you access to thousands of cores and terabytes of memory. This scalability is what makes modern scientific computing, machine learning, and data analysis possible at the scales we see today.
The Evolution: From MPI to NCCL
Message Passing Interface (MPI) has been the cornerstone of multi-node computing for decades, enabling processes on different nodes to communicate efficiently. Today's landscape includes:
- Traditional MPI: CPU-focused parallel computing with libraries like OpenMPI, MPICH, Intel MPI often in combination with OpenMP.
- NCCL (NVIDIA Collective Communication Library): GPU-optimized communication for deep learning and AI workloads
Two Critical Phases of Multi-Node Jobs
Every multi-node job involves two distinct phases:
- Resource Allocation: The scheduler reserves and assigns compute resources across nodes
- Process Execution: The actual application launches and coordinates across allocated resources
Core Components: The Building Blocks That Make It All Work
Understanding multi-node jobs means getting familiar with several key components that work together seamlessly. Each piece serves a specific purpose, and when you see how they interact, the seemingly complex world of multi-node scheduling starts to make sense.
Complexes: Defining What Resources Actually Are
Before we can allocate resources, the scheduler needs to understand what resources exist in your cluster. This is where complexes come in—they're essentially resource definitions that tell GCS/OCS about the different types of resources available on each node. Think of complexes as the vocabulary your scheduler uses to understand your hardware.
A complex might define that nodes have attributes like memory (mem_free, h_vmem, h_rss), CPU cores (slots), GPUs (gpu), or specialized resources like software licenses (matlab_licenses). When you request resources in a job, you're actually requesting specific complex values. The scheduler uses these definitions to match your job requirements with available hardware.
# Example complex definitions
qconf -sc
#name              shortcut  type        relop   requestable consumable  default  urgency
mem_free           mf        MEMORY      <=      YES         YES         0        0
slots              s         INT         <=      YES         YES         1        1000
gpu                gpu       RSMAP       <=      YES         HOST        0        2000
Key definitions are:
- type: MEMORY allows making memory-type requests (e.g., 16G). INT is a simple counter. RSMAP defines a resource that is counted but has multiple distinct instances (such as GPUs per node, network devices per node, ports per node, etc.). There are many more types of resources that can be defined.
- consumable: YES means the resource is decremented from a preconfigured value (as set in the global or host configuration) when a job is granted the resource. HOST means the qsub request is per host, independent of how many slots the job is granted on a host. JOB means the resource request is per job, not per slot.
- urgency: The Slots complex has a default urgency of 1000, which makes larger jobs (with more slots) higher priority than smaller jobs (as they are harder to schedule). This way, costly resources can boost jobs that request them, keeping those resources busy. How effective the urgency policy actually is depends on the overall priority configuration.
Once new complexes/resources are defined they need to be initialized with a value either on host, queue instance, or global level. This is done in the global host configuration, local host configuration, or queue configuration.
Parallel Environment (PE) Configuration
The Parallel Environment is where the magic really happens. It's an administrator-configured template that defines exactly how multi-node jobs should behave in your cluster. Think of it as a recipe that tells the scheduler how to distribute your job across multiple machines and how those machines should coordinate with each other.
# Example PE configuration
qconf -sp mpi
pe_name              mpi
slots                999
user_lists           NONE
xuser_lists          NONE
start_proc_args      /bin/true
stop_proc_args       /bin/true
allocation_rule      $pe_slots
control_slaves       FALSE
job_is_first_task    TRUE
urgency_slots        min
accounting_summary   FALSE
ign_sreq_on_mhost    FALSE
master_forks_slaves  FALSE
daemon_forks_slaves  FALSE
...
Key PE Parameters:
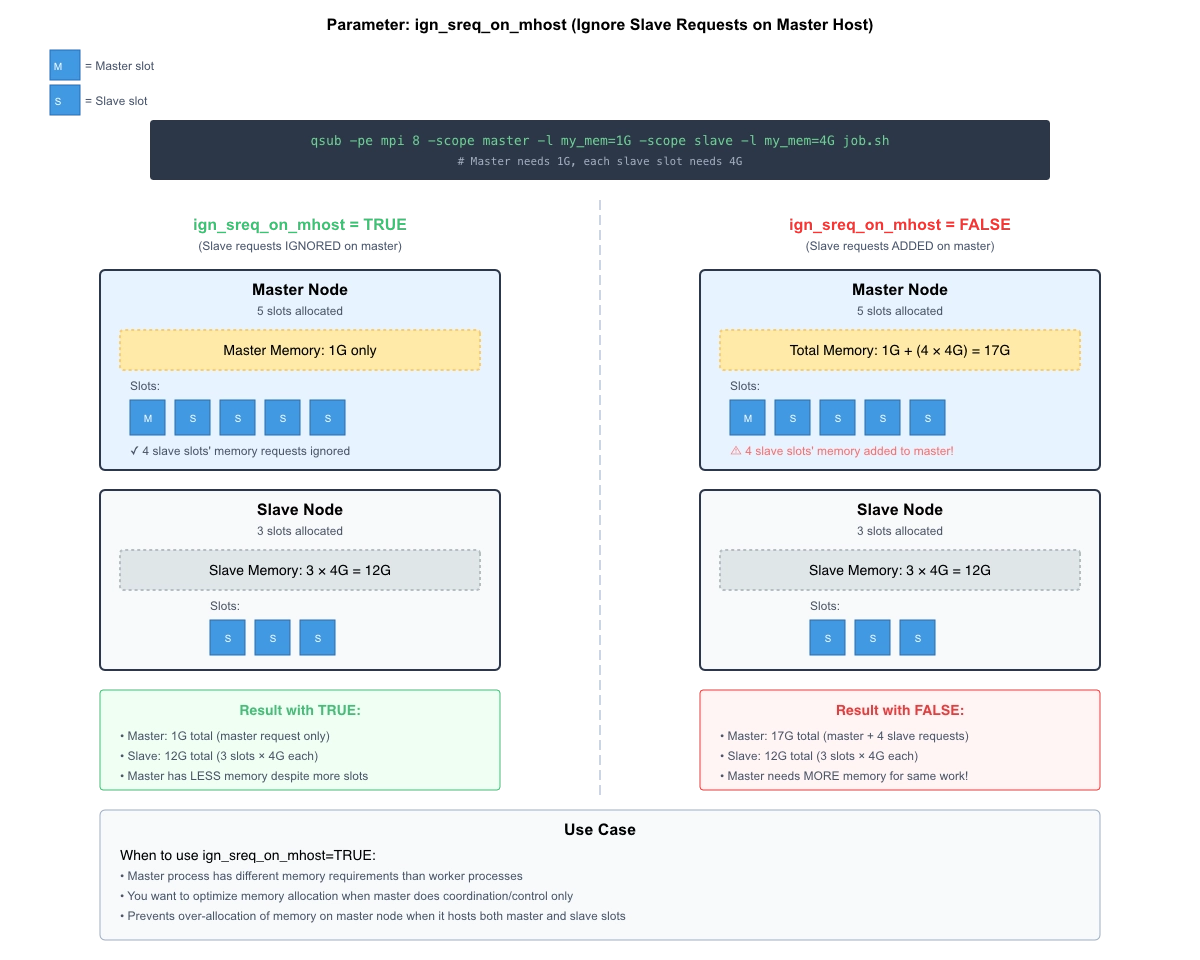
allocation_rule: Controls how slots are distributed ($fill_up,$round_robin,$pe_slots, or fixed numbers for a fixed amount of slots per node)control_slaves: Enables scheduler control over all allocated nodes, i.e. the scheduler will enforce per-node limits on the resources requested by the job and measure resource consumption. That requires that tasks are launched with theqrsh -inheritcommand (instead ofsshor other means).ign_sreq_on_mhost: Ignores slave resource requests on master task host if multiple slots there. That allows to have a master task host with less resources (like less memory) than the worker tasks.
Job Submission Commands
qsub: Batch job submission for non-interactive workloads
qsub -pe mpi 16 my_parallel_job.sh
qrsh: Interactive job submission for development and debugging
qrsh -pe mpi 8 -l h_rt=02:00:00
qrsh -inherit: When control_slaves is enabled this command allows to start the workload on the selected remote machines. Think of it as ssh'ing from the main machine of the parallel job allocation to the other selected machines and executing workload in a controlled way. The key point with qrsh -inherit is that it will not just inherit the resource limits of the original job and enable accounting, but on the remote machines there will be also a cleanup of leftover processes at job termination.
qrsh -inherit hostname
MPI Integration Through SGE Compatibility
Thanks to SGE API compatibility, GCS/OCS seamlessly integrates with all major MPI implementations:
- OpenMPI: OpenMPI can be compiled with
--with-sgesupport. Then OpenMPI automatically recognizes by env variables when it is running as Gridware Cluster Scheduler job. Check out the "SGE" chapter in the OpenMPI documentation. - Intel MPI/MPICH: Recognizes
$PE_HOSTFILEautomatically.
Walking Through Your First Interactive Multi-Node Job
The best way to understand multi-node jobs is to create one interactively and explore what happens behind the scenes. Interactive jobs using qrsh are invaluable for learning because you can inspect the environment, test configurations, and understand exactly how the scheduler has allocated your resources.
Starting Your Interactive Multi-Node Job
Let's begin with a straightforward request for an interactive job that spans multiple nodes. For that it is expected to have a parallel environment mpi defined.
$ qrsh -pe mpi 8 -l h_rt=02:00:00 -l mem_free=4G
[user@node001 ~]$
What just happened here is quite fascinating. The scheduler looked at your request for 8 slots using the "mpi" parallel environment, found available resources across one or more nodes, reserved them for 2 hours, and gave you a shell on what's called the "master" node. Further, it ensures that each machine has at least 4GB of memory available for each slot. Since mem_free is by default not configured as consumable "yes", the scheduler will not decrement the resource from the total available memory. But you can do so by defining a new memory complex as consumable, assign the amount of host memory to it and request it in the job submission command.
Exploring Your Allocated Resources
Now that you're inside the job, let's explore what the scheduler has given you. The first thing to check is the $PE_HOSTFILE environment variable, which contains crucial information about your allocation:
[user@node001 ~]$ echo "Job ID: $JOB_ID"
Job ID: 12345

[user@node001 ~]$ echo "Parallel Environment: $PE"
Parallel Environment: mpi

[user@node001 ~]$ echo "Total slots allocated: $NSLOTS"
Total slots allocated: 8

[user@node001 ~]$ echo "Master queue: $QUEUE"
Master queue: batch.q

[user@node001 ~]$ echo "PE hostfile location: $PE_HOSTFILE"
PE hostfile location: /opt/gridware/default/spool/execd/node001/12345.1/pe_hostfile
Decoding the PE_HOSTFILE Format
The PE_HOSTFILE is where the real magic lives. This file tells you exactly how your job is distributed across the cluster:
[user@node001 ~]$ cat $PE_HOSTFILE
node001.cluster 4 batch.q@node001.cluster UNDEFINED
node002.cluster 4 batch.q@node002.cluster UNDEFINED
This format is deceptively simple but very important. The first column shows the hostname, and the second column shows how many slots (cores) you have on that node. In this case, your 8 slots are evenly distributed: 4 on node001 and 4 on node002. The third column indicates which queue each allocation came from.
Creating Hostlists and Understanding Slot Distribution
Many MPI implementations need a simple hostlist rather than the full PE_HOSTFILE format. Here's how to create different formats from your allocation:
# Simple hostlist (one entry per node)
[user@node001 ~]$ awk '{print $1}' $PE_HOSTFILE
node001.cluster
node002.cluster

# Hostlist with repetition based on slots (useful for some MPI implementations)
[user@node001 ~]$ awk '{for(i=1;i<=$2;i++) print $1}' $PE_HOSTFILE
node001.cluster
node001.cluster
node001.cluster
node001.cluster
node002.cluster
node002.cluster
node002.cluster
node002.cluster

# Get slots per host in a more readable format
[user@node001 ~]$ awk '{printf "Host: %s has %d slots\n", $1, $2}' $PE_HOSTFILE
Host: node001.cluster has 4 slots
Host: node002.cluster has 4 slots
Accessing Your Allocated Nodes with qrsh -inherit
Here's where things get really interesting. From within your multi-node job, you can use qrsh -inherit to access any of your allocated nodes. This inherits the job environment and resource limits, which is crucial for understanding how resource consumption works:
# Connect to the second node in your allocation
[user@node001 ~]$ qrsh -inherit hostname /bin/bash -c "hostname && env"
Note that you can only make as many parallel qrsh -inherit connections to
a remote machine as the number of slots you got allocated on that machine. If the parameter
daemon_forks_slaves is set to TRUE, only one connection is allowed per machine
as it is expected that the remote workload forks itself or creates the threads.
Understanding Resource Limits and Consumption
This is a critical concept that many users miss. When you use qrsh -inherit, you're not
starting a new job—you're accessing resources that are already allocated to your existing job.
The resource limits that were applied to your original job submission are now in effect across all your allocated nodes.
The scheduler is now tracking resource consumption across all nodes in your allocation. If you start processes that exceed your memory limits or run past your time limit, the entire job (across all nodes) will be terminated. This is how multi-node resource management maintains fairness and prevents jobs from consuming more than their share.
How much resources of a certain type a parallel job is consuming or allowed to consume depends on multiple settings:
- qsub command line settings
- amount of slots granted to the job
- amount of slots granted to a particular node
- resource type
- consumable flag: YES means the resource request is multiplied by granted slots, JOB means the resource request is per job, not per slot, HOST means the resource request is per host
Testing Multi-Node Connectivity and Coordination
Before launching a real parallel application, it's often useful to test connectivity between your allocated nodes:
# From the master node, test SSH connectivity to all allocated hosts
[user@node001 ~]$ for host in $(awk '{print $1}' $PE_HOSTFILE); do
    echo "Testing connection to $host:"
    qrsh -inherit $host /bin/bash -c "hostname; date; echo 'Connection successful'"
done

Testing connection to node001.cluster:
node001.cluster
Thu Sep 8 14:30:15 PDT 2025
Connection successful

Testing connection to node002.cluster:
node002.cluster
Thu Sep 8 14:30:16 PDT 2025
Connection successful
Launching Your First Multi-Node Application
With everything verified, you can now launch parallel applications that will use your allocated resources:
# Simple parallel execution across all allocated slots
[user@node001 ~]$ mpirun -np $NSLOTS -hostfile $PE_HOSTFILE hostname
node001.cluster
node001.cluster
node001.cluster
node001.cluster
node002.cluster
node002.cluster
node002.cluster
node002.cluster

# The output shows that MPI correctly distributed 4 processes to each node
For a detailed explanation of different MPI implementations and their usage with Gridware Cluster Scheduler and Open Cluster Scheduler please check out: https://github.com/hpc-gridware/clusterscheduler/tree/master/source/dist/mpi
Note, this covers also integrations for multi-node job types which are ssh based rather than using MPI.
Complex Example of Memory Allocation on Different Nodes
One of the newer features of Gridware Cluster Scheduler is the ability to allow requests for different memory allocations on different nodes. In particular, the master task node and the worker nodes are distinguished. This is useful for example when the master task node requires much less memory and can therefore host multiple master tasks of multiple parallel jobs.
The new qsub parameter -scope allows to make different resource requests for master task and worker tasks (and global).
Following illustration shows a parallel job which got granted 5 slots on the master task node and 3 slots on the worker nodes. By enabling the setting to ignore slave requests on the master task node, the job got actually only the amount of requested memory on the master task node even when having more tasks granted on the master task node.
Key Takeaways
Understanding multi-node jobs in GCS/OCS requires grasping several interconnected concepts:
- Parallel Environments define the framework for multi-node execution
- Resource allocation happens before process execution, with distinct per-host and per-job semantics
- Interactive jobs (
qrsh) are invaluable for learning and debugging - MPI integration works seamlessly through SGE compatibility
- RSMAP provides fine-grained resource control when not just the amount of granted resources are interesting but also the selected identifiers (like GPU IDs, network device IDs, network ports, etc.)
The numerous parameters exist because HPC environments are diverse—from tightly-coupled simulations requiring low-latency interconnects to embarrassingly parallel workloads that can tolerate higher latency. GCS/OCS provides the flexibility to optimize for any scenario.
With this foundation, you're equipped to configure parallel environments, submit multi-node jobs, and troubleshoot issues that arise. Whether you're scaling traditional HPC applications or modern AI workloads, multi-node job mastery is essential for unlocking your cluster's full potential.
Start with interactive jobs for experimentation, then transition to batch jobs for production workloads. The investment in understanding these concepts pays dividends in computational efficiency and resource utilization.
Ready to implement multi-node computing in your environment? Gridware Cluster Scheduler provides enterprise-grade support with the flexibility of open-source innovation. Feel free to contact me at dgruber@hpc-gridware.com for deployment assistance and advanced configuration guidance.